kernel version: 5.18(4b0986a3613c)
本文中的大部分代码段都有代码删除
系统启动过程的最后一个阶段:挂载根文件系统、执行根文件系统中的init程序完成到用户空间的切换。然而根文件系统可能是在不同的硬件设备上,如SCSI硬盘、SATA硬盘、Flash设备等,后续会出现更多的硬件设备;根文件系统可以是xfs、ext4、NFS等不同的文件系统;为了成功挂载根文件系统,内核需要具备相应的设备驱动、文件系统驱动,如果为了兼容所有的根文件系统,将所有相关驱动编译进内核,会增大内核大小,并在实际环境中引入一些无用的驱动。
initramfs作为一个过渡文件系统解决了挂载根文件系统的兼容性。其中包含了必要的硬件设备、文件系统驱动以及驱动的加载工具及其运行环境。initramfs可以编译进内核也可以作为单独文件由bootloader加载入内存,在内核初始化的最后阶段,会解压initramfs,运行其中的init程序完成根文件系统挂载,并执行根文件系统中的init程序,完成内核空间到用户空间的切换。
Linux kernel 2.6引入initramfs机制,之前使用initrd完成上述工作。当前主流Linux发行版采用initramfs机制,内核仍兼容initrd。人们还是习惯将initramfs称作initrd,本文会对二者进行严格的区分。
initramfs vs initrd
initrd与initramfs之间的主要区别是initrd基于ramdisk机制,而initramfs基于ramfs。内核文档<ramfs, rootfs and initramfs>很好地介绍、对比了两种机制,本文在后面几小节简要总结。
ramdisk ramfs tmpfs rootfs
ramdisk是将固定大小的内存模拟成块设备,需要文件系统(如ext2)格式化块设备以存取数据。同块设备一样,ramdisk的数据读取也会用到磁盘缓存机制(disk caching mechanisms, “page cache” for file data, “dentry cache” for directory entries)。显然,ramdisk有些多此一举,文件实际存储在内存中,但文件读取还要通过基于内存的磁盘缓存。ramdisk机制的缺点原文概括的十分精准:
this wastes memory (and memory bus bandwidth), creates unnecessary work for the CPU, and pollutes the CPU caches. (There are tricks to avoid this copying by playing with the page tables, but they’re unpleasantly complicated and turn out to be about as expensive as the copying anyway.
既然访问文件都要经过磁盘cache,为何不直接将文件保存在磁盘cache?Linus实现了一个伪文件系统(dummy filesystem)ramfs,完成了最低限度的VFS接口实现,即文件创建时能够在inode cache中创建相应的inode和dentry,并将文件直接保存在磁盘cache中。存储文件的页面不会被标记为clean,因此保存在磁盘cache中的文件页面不会被回收,除非文件被删除。
ramfs有两个显著的缺点:
- 内存占用无限制,只要愿意往ramfs存储数据,文件便会占用内存,而不受限
- 基于上一点,只有root用户能够在ramfs中读/写数据
社区在ramfs的基础上开发了tmpfs,tmpfs增加了size limits,不能无限制地往内存中写文件;并支持将磁盘缓存中的文件数据写入swap空间。因此,tmpfs支持普通用户访问其挂载点。
initramfs的文件类型是cpio归档件的gzip压缩类型,即cpio.gz。rootfs是ramfs(或者tmpfs)的一个特殊示例,initramfs中的文件会被解压到rootfs中。当CONFIG_TMPFS配置时,默认使用tmpfs代替ramfs作为rootfs。若需要强制使用ramfs作为rootfs,可以通过内核启动项参数rootfstype=ramfs指定。
rootfs挂载
1 | start_kernel |
init_rootfs同时满足如下条件时便以tmpfs作为rootfs:
CONFIG_TMPFS配置未通过
root内核启动项参数指定根文件系统所在的设备未通过
rootfstype内核启动项参数指定rootfs类型或者指定类型就是tmpfs1
2
3
4
5
6
7
8
9
10
11
12
13
14
15
16
17
18
19
20
21
22
23
24
25static int rootfs_init_fs_context(struct fs_context *fc)
{
if (IS_ENABLED(CONFIG_TMPFS) && is_tmpfs)
return shmem_init_fs_context(fc);
return ramfs_init_fs_context(fc);
}
struct file_system_type rootfs_fs_type = {
.name = "rootfs",
.init_fs_context = rootfs_init_fs_context,
.kill_sb = kill_litter_super,
};
static void __init init_mount_tree(void)
{
...
struct vfsmount *mnt = vfs_kern_mount(&rootfs_fs_type, 0, "rootfs", NULL);
struct mnt_namespace *ns = alloc_mnt_ns(&init_user_ns, false);
m = real_mount(mnt);
m->mnt_ns = ns;
ns->root = m;
init_task.nsproxy->mnt_ns = ns;
...
}init_mount_tree完成rootfs挂载,若rootfs为tmpfs,则使用shmem_init_fs_context初始化文件系统上下文。并初始化0号进程init_task的mnt_namespace(mnt命名空间)为rootfs。
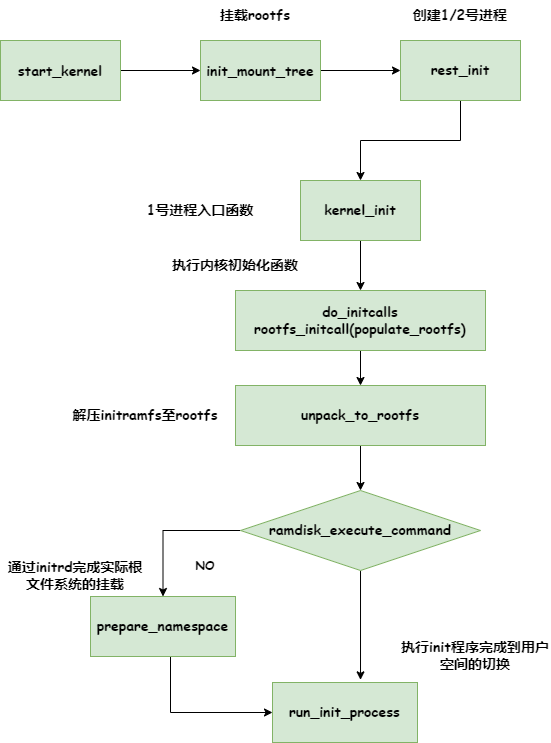
rest_init创建1号进程和2号进程,1号进程是init进程,完成后续的系统初始化工作,最终完成内核空间到用户空间的切换;2号进程是kthreadd进程,负责完成内核kernel_thread创建进程的工作。
1 | ps -ef |
ps命令查看到的1号进程是切换到用户空间之后的systemd进程,并非当前rest_init创建的1号进程。
1 | noinline void __ref rest_init(void) |
kernel_init process covers all
kernel_init在执行之处调用wait_for_completion(&kthreadd_done),即等待2号进程创建并初始化成功之后才开始后续工作:
1 | kernel_init |
kernel_init_freeable完成内核部分子系统初始化,如workqueue、启动其他CPU、SMP初始化等操作。待所有CPU上线、进程、内存核心子系统初始化完成,调用do_basic_setup完成其他初始化操作,其中包括do_initcalls执行init段中的函数即调用initcall回调函数,populate_rootfs调用do_populate_rootfs完成initramfs解压到rootfs的工作,或者通过prepare_namespace通过initrd完成实际根文件系统的挂载。
通过run_init_process启动可执行程序,完成从内核空间到用户空间的切换,可以是如下程序:
| var | initial value | kernel cmdline/CONFIG | description |
|---|---|---|---|
| ramdisk_execute_command | “/init” | “rdinit=” | Run specified binary instead of /init from the ramdisk,used for early userspace startup. |
| execute_command | NULL | “init=” | Run specified binary instead of /sbin/init as init process. |
| CONFIG_DEFAULT_INIT | “” | CONFIG_DEFAULT_INIT | Default init path |
如果上述路径的init程序未成功执行,则依次尝试运行如下程序:/sbin/init、/etc/init、/bin/init、/bin/sh。通过initramfs过渡和通过initrd过渡获得的init程序职责是不同的。通过initrd过渡,由于已经完成了实际根文件系统的挂载,这里运行的init程序是实际根文件系统的init程序。然而,initramfs过渡得到的init程序还肩负着挂载实际根文件系统的责任!
initramfs unpack
1 | void wait_for_initramfs(void) |
async_schedule_domain、async_synchronize_cookie_domain是内核的异步执行机制,通过并行化initramfs的解压工作加快内核启动:
async_schedule_domain:调度函数异步执行,返回异步执行函数的async cookieasync_synchronize_cookie_domain: 同步小于async cookie的异步函数执行
默认情况下,initramfs解压操作do_populate_rootfs会被异步执行;调用wait_for_initramfs函数等待initramfs解压操作完成。也可以通过内核启动项参数initramfs_async=false将initramfs解压流程变更为顺序执行。
1 | static void __init do_populate_rootfs(void *unused, async_cookie_t cookie) |
do_populate_rootfs将initramfs/initrd解压到rootfs中:
- 将链接进内核的initramfs解压至rootfs中,链接到内核的initramfs在内存中的起始地址是
__initramfs_start,大小是__initramfs_size - 若内核未配置
CONFIG_INITRAMFS_FORCE(忽略bootloader传入的initramfs)且(通过initrd=<path>或者initrdmem=<physical addr>)指定了initramfs地址(initrd_start不为0),则将指定的initramfs解压至rootfs中,否则直接跳至4 - 若2中的initramfs解压失败,则认为2中解压的image不是initramfs,而是initrd。调用
populate_initrd_image在rootfs中创建/initrd.image文件,并将initrd的内容写入到文件 - 如果没配置内核启动项参数
retain_initrd、keepinitrd,而且指定了initramfs地址,则调用kexec_free_initrd释放initramfs与crashkernel不重叠部分的内存区域,若两者无重叠,则完全释放指定的initramfs内存区域
__initramfs_start在include/asm-generic/vmlinux.lds.h中定义,在include/linux/initrd.h中对外声明,内核包含include/linux/initrd.h文件,即可访问__initramfs_start变量:
1 | include/linux/initrd.h: |
vmlinux.lds是内核构建过程所使用的链接脚本,这里vmlinux.lds通过vmlinux.lds.S预编译生成,这样可以利用条件编译,根据不同的内核配置生成不同的链接脚本。参考内核文档Documentation/kbuild/makefiles.rst
   When the vmlinux image is built, the linker script
   arch/$(SRCARCH)/kernel/vmlinux.lds is used.
   The script is a preprocessed variant of the file vmlinux.lds.S
   located in the same directory.
   kbuild knows .lds files and includes a rule `*lds.S` -> `*lds`.

   Example::

           #arch/x86/kernel/Makefile
           extra-y := vmlinux.lds

   The assignment to extra-y is used to tell kbuild to build the
   target vmlinux.lds.
   The assignment to $(CPPFLAGS_vmlinux.lds) tells kbuild to use the
   specified options when building the target vmlinux.lds.

   When building the `*.lds` target, kbuild uses the variables::

           KBUILD_CPPFLAGS : Set in top-level Makefile
           cppflags-y      : May be set in the kbuild makefile
           CPPFLAGS_$(@F)  : Target-specific flags.
                           Note that the full filename is used in this
                           assignment.

   The kbuild infrastructure for `*lds` files is used in several
   architecture-specific files.
Documentation/kbuild/makefiles.rst连接脚本定义了符号__initramfs_start所在地址:
special symbol ‘.’, which is the location counter.
链接脚本定义的符号与普通符号(在程序中定义的符号)的区别是链接脚本中的符号仅代表一个地址,而普通符号不仅代表一个地址,还有该地址的内存空间。
关于initrd内核启动项参数可能会带来一些困惑,先查看内核文档中的介绍:
1 | Documentation/admin-guide/initrd.rst: |
相应内核启动项参数的代码:
1 | init/do_mounts_initrd.c: |
内核代码中的initrd内核启动项参数就是initrdmem内核启动项参数,指定initramfs的物理地址。那么Documentation/admin-guide/initrd.rst中描述initrd=<path>的内核启动项参数是不是错误呢?
非也,从x86_64和arm64中initrd_start赋值进行排查,应该能发现端倪:
1 | x86_64: |
x86_64平台下,bootloader启动内核遵循Linux/x86 Boot Protocol,约束了加载到内核的内存布局,也规定了bootloader与内核交互接口。
x86 64bit boot protocol规定,bootloader加载内核会初始化清零boot parameters(struct boot_params,也称为zero page);随后读取内核的Real-Mode kernel header(struct setup_header,内核镜像0x01f1偏移处)至zero page的setup_header,这个过程中,bootloader完成initramfs地址的设置。
arm64平台通过FDT(flatten device tree)中的chosen节点设置内核启动项参数(bootargs)以及initramfs(initrd-start、initrd-end)[1]。
Compatible with initrd
initramfs解压完成之后,检查rootfs中是否存在early userspace startup init程序。内核变量ramdisk_execute_command指定init程序路径,默认是/init,也可以通过rdinit=<full_path>内核启动项参数指定程序路径。
若rootfs中不存在init程序,则认为指定的是initrd,而非initramfs。之前通过解压initramfs的方式解压initrd不成功,则当前rootfs中自然不存在init程序,见do_populate_rootfs中的流程3。需要调用prepare_namespace通过initrd完成实际根文件系统的挂载。
1 | void __init prepare_namespace(void) |
saved_root_name变量保存根文件系统所在的设备,由内核启动项参数root=指定,默认为空。saved_root_name存在两种情况:
- 若根文件系统存在于mtd/ubi设备,驱动程序在内核初始化阶段已经安装,可以直接挂载,无需initrd过渡文件系统
- 根文件系统存在于其他设备,则需先挂载先挂载initrd过渡,插入存储在initrd文件系统中的根文件系统所在存储设备的驱动,最后再挂载实际根文件系统。这个过程由
initrd_load完成。
initrd_load可以拆分为如下两步:
rd_load_image将initrd解压/读入到ramdisk中(/dev/ram设备节点)handle_initrd完成实际根文件系统挂载1
2
3
4
5
6
7
8
9
10
11
12
13
14
15
16
17
18
19
20
21
22
23
24
25
26
27
28
29
30
31
32
33
34
35
36
37
38
39
40
41
42
43
44
45
46
47
48
49
50
51
52
53
54
55
56
57
58
59
60
61
62
63
64
65
66
67
68
69
70
71
72
73
74
75
76
77
78
79
80
81
82
83
84
85
86
87
88int __init rd_load_image(char *from)
{
...
out_file = filp_open("/dev/ram", O_RDWR, 0);
in_file = filp_open(from, O_RDONLY, 0);
// 通过内核启动项参数ramdisk_start指定ramdisk在initrd image中的起始地址(offset),默认值为0
in_pos = rd_image_start * BLOCK_SIZE;
nblocks = identify_ramdisk_image(in_file, in_pos, &decompressor);
if (nblocks < 0)
goto done;
if (nblocks == 0) {
if (crd_load(decompressor) == 0)
goto successful_load;
goto done;
}
// rd_blocks表示/dev/ram ramdisk实际大小
rd_blocks = nr_blocks(out_file);
// initrd image中要读入的大小超过了ramdisk的大小
if (nblocks > rd_blocks) {
printk("RAMDISK: image too big! (%dKiB/%ldKiB)\n",
nblocks, rd_blocks);
goto done;
}
buf = kmalloc(BLOCK_SIZE, GFP_KERNEL);
for (i = 0; i < nblocks; i++) {
kernel_read(in_file, buf, BLOCK_SIZE, &in_pos);
kernel_write(out_file, buf, BLOCK_SIZE, &out_pos);
}
...
}
static void __init handle_initrd(void)
{
...
// real_root_dev编码保存实际根设备
real_root_dev = new_encode_dev(ROOT_DEV);
// 创建Root_RAM0的设备文件/dev/root.old
create_dev("/dev/root.old", Root_RAM0);
// 将initrd挂载到rootfs的root目录
mount_block_root("/dev/root.old", root_mountflags & ~MS_RDONLY);
// 创建/root/old目录
init_mkdir("/old", 0700);
init_chdir("/old");
// 执行用户态程序/root/linuxrc加载驱动模块
info = call_usermodehelper_setup("/linuxrc", argv, envp_init,
GFP_KERNEL, init_linuxrc, NULL, NULL);
call_usermodehelper_exec(info, UMH_WAIT_PROC);
...
/* move initrd to rootfs' /old */
// 将/root挂载点下的文件移动到/root/old目录下:mount --move olddir newdir
init_mount("..", ".", NULL, MS_MOVE, NULL);
// 将/root目录切换为系统的根目录
init_chroot("..");
// 实际根文件系统所在的设备是否是Root_RAM0
if (new_decode_dev(real_root_dev) == Root_RAM0) {
// 切换到/old目录,因为/old目录就是/dev/ram设备存储的内容
init_chdir("/old");
return;
}
init_chdir("/");
ROOT_DEV = new_decode_dev(real_root_dev);
// 将实际根设备挂载到/root目录
mount_root();
// 将/old挂载点的内容移动到/root/initrd目录下显示
error = init_mount("/old", "/root/initrd", NULL, MS_MOVE, NULL);
}
bool __init initrd_load(void)
{
if (mount_initrd) {
// 创建/dev/ram设备节点,代表设备编号Root_RAM0
create_dev("/dev/ram", Root_RAM0);
// 如果/initrd.image中存在initrd,将其装载到/dev/ram中,且/dev/ram不是最终的根文件系统
if (rd_load_image("/initrd.image") && ROOT_DEV != Root_RAM0) {
init_unlink("/initrd.image");
handle_initrd();
return true;
}
}
init_unlink("/initrd.image"); // 删除文件/initrd.image
return false;
}mount_initrd初始值为1,表示是否加载initrd。通过noinitrd内核启动项参数设置mount_initrd为0,表示内核不加载任何配置的initrd。rd_load_image将initrd读入到内存虚拟的ramdisk中。initrd可能被压缩处理,根据identify_ramdisk_image返回值initrd是否被压缩:
- -1, initd中的magic number有误
- 0,initrd被压缩,随后调用
crd_load(decompressor)解压initrd到/dev/ram - nblocks(> 0),initrd未被压缩,nblocks表示initrd的大小,以block(1024byte)为单位表示,随后直接从
/initrd.image读入到/dev/ram
initrd可以是minix、ext2、romfs、cramfs、squashfs文件系统。压缩算法支持gzip、bzip2、lzma、xz、lzo、lz4。
handle_initrd首先将载有initrd的ramdisk挂载到rootfs的/root目录,随后执行用户态程序/root/linuxrc加载最终根文件系统所需的驱动模块。内核文档Documentation/driver-api/early-userspace/early_userspace_support.rst说明了linuxrc程序的作用:
some device and filesystem drivers built as modules and stored in an initrd. The initrd must contain a binary ‘/linuxrc’ which is supposed to load these driver modules. It is also possible to mount the final root filesystem via linuxrc and use the pivot_root syscall. The initrd is mounted and executed via prepare_namespace().
最后调用mount_root挂载实际根文件系统,上述步骤完成之后,rootfs中的目录结构如下:
1 | 最终根文件系统不在/dev/ram |
如果根文件系统在块设备上,mount_root调用mount_block_root完成文件系统的挂载:
1 | void __init mount_block_root(char *name, int flags) |
Summary and example
内核启动过程的initramfs阶段兼容了initrd启动方式,流程总结如下:
- 挂载rootfs
- 创建1号进程kernel_init,启动过程的initramfs阶段的初始化工作由1号进程完成
- 执行内核初始化函数populate_rootfs,解压initramfs至rootfs
- 若步骤3未配置initramfs,则认为使用的是legacy initrd,调用prepare_namespace通过initrd完成实际根文件系统的挂载
- 调用rootfs中的init程序完成后续初始化工作,并切换到用户空间,成为实际根文件系统的1号进程。由于initrd的过渡方式已经挂载实际根文件系统,此时执行的是实际根文件系统的init程序。而initramfs的过渡方式,执行的是initramfs中的init程序,还需要完成挂载实际根文件系统的工作。

解压CentOS8的initramfs,发现initramfs的init程序是systemd程序的软连接:
1 | $ mkdir -p ~/centos-initramfs && cd ~/centos-initramfs |
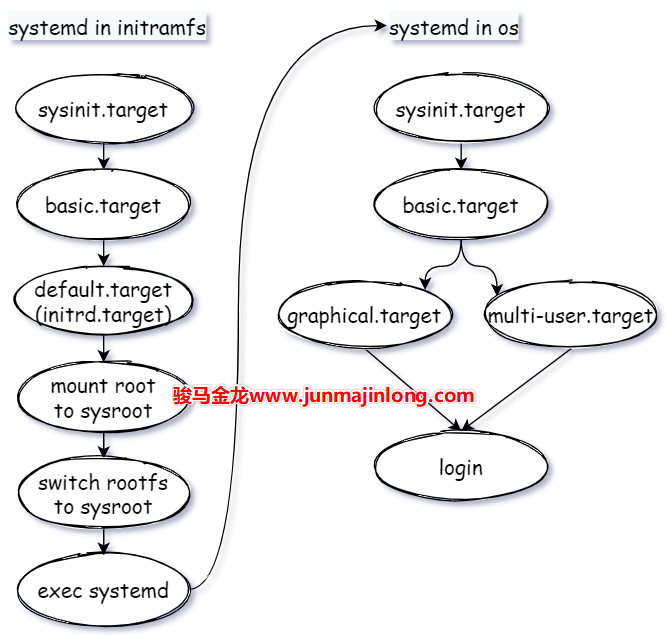
下图[3]总结了systemd在启动阶段的工作:
- 实际根文件系统尚未挂载,相关的systemd程序以及target源于initramfs
1.1. sysinit.target: 读系统环境做初始化
1.2. basic.target: 完成早期开机自启动的初始化工作
1.3. default.target是一个软链接,指向initrd.target,为后续切换到实际根文件系统做初始化准备
1.4 将实际根文件系统挂载到/sysroot目录,将/sysroot目录挂载到当前的根目录,实际根文件系统完成挂载。exec实际根文件系统中的systemd,完成到用户空间进程的切换 - 实际根文件系统挂载后,执行的systemd及target源于根文件系统。同样会经历sysinit.target、basic.target阶段,不论是initramfs,还是根文件系统,这两个阶段都是为default.target阶段做准备。default.target也是个软链接,决定相应的“运行级别”,当前系统指向graphical.target表示进入的是图形终端。也可以指向multi-user.target进入无图形化终端[4]。

以 “.target” 为后缀的单元文件, 封装了一个由 systemd 管理的启动目标, 用于在启动过程中将一组单元汇聚到一个众所周知的同步点。
Reference
[1] https://stackoverflow.com/questions/64877292/how-does-the-bootloader-pass-the-kernel-command-line-to-the-kernel
[2] https://zhuanlan.zhihu.com/p/489819324
[3] https://www.junmajinlong.com/linux/systemd/systemd_bootup/
[4] https://unix.stackexchange.com/questions/404667/systemd-service-what-is-multi-user-target


